Specification:
Model: WLS-PVA100 WLS-PVA200 WLS-PVA400
Current measurement range: 100A 200A 400A
Current resolution: 0.1A 0.1A 0.2A
Supply voltage range: DC5 ~ 90V
Voltage measurement range: DC0 ~ 300V
Voltage resolution: 0.1V
Capacity measurement range: 0 ~ 999AH
Power measurement range: 0 ~ 999KW
Energy measurement range of: 0 ~ 999KWH
Table measurement error: + -1%
Refresh rate of: 0.5S refresh time to display information
Installation slot size: 76.0mm * 39.5mm
Sensor threading hole diameter: Φ20mm
Operating current when the backlight is lit: 10MA.
When the backlight is off: 4MA.
Package Included:
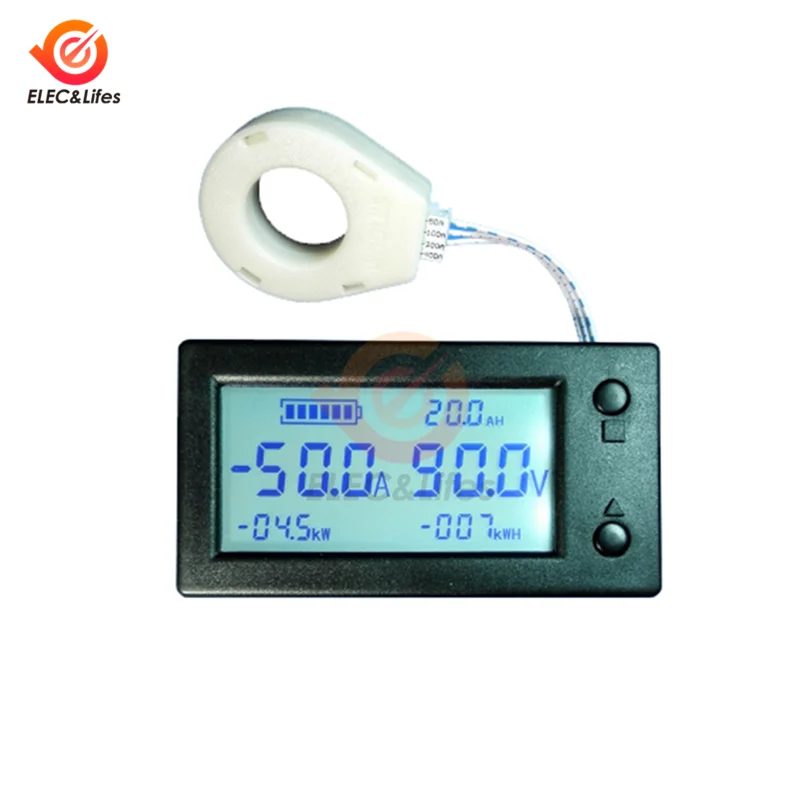
1pcs * STN LCD head
1pcs * Hall sensor
1pcs * 15CM sensor cable
1pcs * 15CM power cord
Manual
1) Function introduction
1. Measure the percentage of remaining battery power (indicated by the number of cells on the battery icon) and the number of remaining power AH.
2. Measure the magnitude of the DC positive and negative bidirectional current. .
3. Measure the DC voltage.
4. Measure the magnitude of DC positive and negative power.
5. Measure the accumulated electric energy in the positive and negative directions of DC.
6. Over-voltage alarm flashing function, alarm voltage size parameters can be set by themselves.
7. Low voltage alarm flashing function, alarm voltage size parameter can be set by yourself.
8. Over current alarm flicker function, alarm current size parameter can be set by yourself. .
9. The low battery remaining battery alarm flashes, and the battery icon will continue to flash, prompting the user to charge.
10. When charging, the battery icon and water indicator scroll to indicate.
11. The full voltage automatically fills up the battery capacity function.
12. Clear current function.
13. Clear the accumulated energy function.
14. The backlight can be turned off or turned on manually.
15. Power-down data storage function, battery power, accumulated energy, etc. are automatically saved when power is off.
16.Isolated measurement using Hall sensor, safe and reliable, easy to install.
17. Adopt STN full viewing angle LCD screen, 360 degree without dead angle. With backlight, no matter night, day, indoor or room
It is clearly visible outside and under direct sunlight.
18. Ultra-wide supply voltage range: DC5~90V,
2)Simple steps for installation and use
1. Wiring first. The correct connection is that the coulomb counter displays positive current when discharging and negative current when charging. If not then you
If the sensor is connected upside down, you can turn the sensor back.
2. Set the parameters. The two parameters, the rated battery capacity AH and the fully charged voltage FU, must be set. New installation
If the current of a good coulomb counter is not zero when there is no load, the current needs to be cleared when there is no load.
3. After connecting the cable and setting the parameters, the meter will not immediately display the battery capacity. At this time, the battery icon and capacity are still
If it is empty, you need to fully charge the battery once to display the remaining power normally. This-point requires special attention.
Button instructions
1. Backlight control:
In the standby display, short press the ▲ key to turn on or off the screen backlight, and the backlight state will be automatically saved when power off.
2. Clear current:
In the standby display, when the load is no-load, long press the ▲ key to clear the current zero point. If the electricity is in no load
If the current is not 0, this method can be used to clear the current zero. (Note:-It must be cleared when there is no load.
Otherwise it will be inaccurate. ) No-load is when there is neither charging nor discharging.
3.Clear energy:
In the standby display, long press the ■ key and then release the key to clear the accumulation of both positive and negative currents at the same time
Positive and negative electric energy.
4. Set parameters: (Note: the [1] [2] menu parameters--must be set, other settings depend on your needs)
In the standby display, short press the key to switch the menu as follows:.
[1]
"AH XXX. X" battery rated capacity setting menu. This parameter must be set. This one
The parameter is set to the rated capacity of your battery.
[2] "FU xXX. X" is fully charged and automatically top up the voltage size setting menu. When the voltage reaches this value,
The power of the coulomb counter is automatically filled and corrected to 100% full. This parameter is recommended to be set, because the battery charge
The discharge efficiency is inconsistent. If it is not set, the accumulated error of the parameter power will be accumulated after multiple charging and discharging.
[3] "HU XXX. X" overvoltage alarm voltage size setting menu
[4] "LU XXX. X" low voltage alarm voltage size setting menu
[5] "HA XXX. X" overcurrent alarm current size setting menu
Battery rated capacity setting method: (1) In standby, short press the key to switch to the menu "AH XXX. X",
(2) The first digit of the menu parameter will flash continuously. At this time, short press the ▲ key and the number will increase by one.
After setting this digit, if you don’t operate the button within 5 seconds, it will automatically skip to the next. The digit flashes. This time
Short press the ▲ key, this number will also increase by one, and if you don’t operate the key within 5 seconds, it will automatically skip to the next digit and flash.
Flash, go to set the next digit. After setting the 4 digits by analogy in this way.
(3) Long press the ■ key (note: long press not short press) and then release the key to save the set parameters.
At this time, the menu will flash twice to prompt the user to save successfully.
For example: To set the rated battery capacity to 20AH, then set this menu parameter to AH020.0, and then
After that, long press the ■ key and release it to save successfully.
Fully charged and automatically top up the voltage setting method: the same as the above method (1) When in standby, short press the key,
Switch to the menu "FU XXX.X", short press the ▲ key to set the parameters, and long press the ■ key to save the settings
The parameters of the settings. (Note: This voltage is recommended to be set higher than when the charger is not unplugged after the battery is fully charged
The voltage displayed by the coulomb counter is 0.3V lower. )
Set the over-voltage alarm voltage value, low-voltage alarm voltage value, and over-current alarm current value by analogy.
(Note: HU XXX.X LU XXX.X
If the three parameters of HAXXX.X are set to 000.0, it means
Turn off the alarm flashing function of this item, the factory default is off. )


 배송기간
배송기간